Administer, Review, and Grade a Moodle Quiz

figo
Last Update 5 years ago
On This Page:
- Configure Quiz Scoring
- Configure Special Quiz Access for Individuals or Groups
- Allow Unlimited Time for Quiz Completion for Specific Students
- Review and Grade Student Attempts
- Regrade a Quiz
- Reset Quiz Attempts
Learn how to adjusting quiz scoring, override quiz access settings for particular students or groups of students, and review and grade student attempts on quizzes.
Configure Quiz Scoring
When a student attempts a quiz activity in Moodle, the student's responses are scored automatically by Moodle based on three parameters that you can configure:
- The Maximum grade specified for the quiz as a whole (this is set to 10.00 by default). The Maximum grade parameter is the maximum possible grade that a student can achieve if the student scored perfectly on all questions in the quiz.
- The Total of points is the sum of all question marks in the activity. (This is equal to the number of questions by default.)
- The Maximum mark each question will be graded out of. (This is set to 1.00 by default.)
Note: Moodle will automatically weight the questions to make sure that the total grade fits within the Maximum grade parameter.
Moodle assigns a value of (question points/Total of points) * Maximum grade for each question. Therefore, if you use the default settings and if a quiz activity had N questions, Moodle will ensure that each question is worth 10/N points. For example, if you have four questions in a quiz with one question graded out of 3 points, this question will be worth: (3/6)*100 = 50. Each of the other questions will be worth (1/6)*100 = 16.67.
Step 1
On your course page, click the link to open the quiz. The Quiz summary page will open.
Step 2
On the Quiz summary page, select the Actions menu (Screenshot of Actions menu), a drop-down list will open. From this list select Edit quiz. The Editing quiz page will open.
Step 3
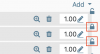
To change the default grade for a question, on the right side of the question click the Edit maximum marks icon (Screenshot to the link to edit maximum marks) and enter the desired number in the edit box, then press Enter.
Note: You must press Enter to save changes for each question.
Step 4
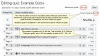
To change the maximum possible grade, enter the new grade in the Maximum grade edit box and click Save.
Note: The Total of marks parameter is not editable, but it will update automatically to reflect the maximum marks for all questions.
Configure a Quiz with Questions Conditional on Other Questions
You can configure a quiz to have questions which are conditional upon another question. This will force a student to answer a question before they can proceed. This mode allows you to include material from the correct answer of a quiz question into another question. For example, if Question 1 asks "What is the first step in turning on your computer?" with the answer being "Press the power button", Question 2 can ask "After you have pressed the power button, what screen will you see?"
Questions conditional upon other questions will display as either grayed out or with text indicating they will be unavailable until a previous question is answered. Some question types do not work with conditional options. Those questions will not appear with the option to lock them.
Note:
This setting is not recommended for use with randomization of questions within a quiz.
Conditional questions can only be used with Interactive with multiple tries, Immediate Feedback, or Immediate Feedback with CBM and Free Navigation must be enabled.
To Configure Your Quiz for Conditional Question Dependencies
To configure your quiz for conditional question dependencies you will need to change your Layout and Question behavior on your Edit settings page. To do so,
Step 1
On your course page, click the link to open the quiz. The Quiz summary page will open.
Step 2
On the Quiz summary page, select the Actions menu (Screenshot of Actions menu), a drop-down list will open. From this list select Edit settings. The Editing settings page will open.
Step 3
Under the Layout heading, click Show more.... This will display extra Layout options.
Step 4
In the Navigation method drop-down list, select Free.
Step 5
Under the Question behavior heading, from the How questions behave drop-down list, select either Interactive with multiple tries, Immediate Feedback.
Click Save and Display. You will be returned to the Quiz Summary page.
To Enable Conditional Question Dependencies
Step 1
On your course page, click the link to open the quiz. The Quiz summary page will open.
Step 2
On the Quiz summary page, select the Actions menu (Screenshot of Actions menu). A drop-down list will open. From this list select Edit quiz. If you do not have questions added, see Add or Edit Questions in a Moodle Quiz.
Step 3
To the left of each question, there is an unlock icon (Screenshot of unlock icon). To add a conditional dependency, click the unlock icon. This will create the conditional dependency. The icon will change to a lock icon (Screenshot of lock icon).
Step 4
To check the dependency, hover over the lock icon.
Step 5
To unlock the question and remove the conditional dependency, click the lock icon. This will remove the conditional dependency. The lock icon will change to an unlocked icon.
Configure Special Quiz Access for Individuals or Groups
There are a variety of situations where you might want to override quiz access settings for specific students or for groups of students. For example, you might want to re-open a quiz for just one student who missed the quiz with a legitimate excuse. Or, you might want a quiz to be available only to a particular group of students. Moodle provides ways for you to implement both user-level overrides and group-level overrides to configure special access permissions for specific students.
Note: This applies only to situations where you want to do a single exemption for a specific student and will not affect attempts that have already been made. In some situations, such as when a student has a Disability Services accommodation, you can use the Student Unlimited Quiz Time role for that student so that they get an extension in all your quiz activities. See Allow Unlimited Time for Quiz Completion for Specific Students (below).
Step 1
On your course page, click the link to the quiz you want to configure. The Quiz summary page will open.
Step 2
On the Quiz summary page, select the Actions menu (Screenshot of Actions menu), a drop-down list will open. From this list select User overrides. The Override summary page will open.
Step 3
Click Add user override. The Edit override page will open.
Step 4
Enter the student's name in the Search box, and then select the student's name from the list of search results.
Modify the settings you want to override. The parameters you can adjust are:
Require password: Specify a unique password for just this particular student.
Open the quiz, Close the quiz: Specify separate open and close dates that apply only for this particular student.
Time limit: Adjust the duration that this student has for taking the quiz, or you can disable this entirely if you want to give the student an unlimited amount of time to finish the quiz.
Attempts allowed: Specify how many attempts this particular student is allowed.
Revert to quiz defaults: Revert the settings back to what they are for all students.
Click Save when you are finished, or to repeat this for more students, click Save and enter another override.
Note: If a student is being given another attempt after they have already taken the quiz, you will need to add an extra attempt here for the student to be allowed to take the quiz again.
Allow Unlimited Time for Quiz Completion for Specific Students
The Student Unlimited Quiz Time role allows you to give specific students unlimited time to complete any of your quiz activities. To apply this role for a particular student:
Step 1
On your course page, from the Navigation Tray toggle (hamburger menu, top left), select Participants. The Participants page will open, showing a table of all users in your course.
Step 2
In the student's row, under the Roles column, click the Pencil icon. An Assign role drop-down box will appear.
Step 3
Click the Assign role drop-down box and select Student - Unlimited quiz time. The student's row will update to show the Student - Unlimited quiz time role above the Assign role drop-down box.
Step 4
Select Save to successfully assign the Student - Unlimited quiz time role to the student.
Step 1
On your course page, locate the Quiz and select the Quiz name to open the quiz. The Quiz summary page will open. If any students have attempted the quiz, you will see a link titled "Attempts: #" where # is the number of attempts made so far.
Step 2
On the Quiz summary page, select Attempts: #. The Attempts summary page will open.
Step 3
To review responses made by a particular student, click the Review attempt link under that student's name in the table.
Note: Moodle scores all question types that support automatic grading. For question types that require manual grading (such as a short answer question), click the Requires grading link in the table for each student. A separate window opens where you can review the student's response to that question. In this window you can enter a number grade for the student's response, and you can provide written feedback for the student to view.
Regrade a Quiz
You might have to regrade the quiz, after students have attempted it:
- If you found that one of the questions on the quiz is incorrect and made the necessary changes.
- If you have to edited either the Maximum mark or Maximum grade settings.
To regrade the quiz in Moodle:
Step 1
On your course page, locate the Quiz and select Quiz name to open the quiz. The Quiz summary page will open. If any students have attempted the quiz, you will see a link titled "Attempts: #" where # is the number of attempts made so far.
Step 2
On the Quiz summary page, select Attempts: #. The Attempts summary page will open.
Step 3
On the Attempts summary page, you can either select Regrade all or Dry run a full grade.
Note: The Dry run a full grade will display which points would change if a real regrade was performed, without actually updating the grades. To update all the grades, select Regrade all or Regrade attempts marked as needing regrading (located above the Attempts summary table) or click Regrade selected attempts (located below the Attempts summary table) to regrade selected attempts.
Reset Quiz Attempts
Occasionally you might want to reset a particular student's quiz attempt (in case you want to allow them to re-attempt the quiz), or you might want to reset all attempts.
Step 1
On your course page, locate the Quiz and select Quiz name to open the quiz.
Step 2
Click Attempts: #. The Attempts summary page will open.
Step 3
Select the check boxes next to the particular student(s) whose attempts you want to delete.
Click Delete selected attempts.