Add a Folder of Files to a Moodle Course

figo
Last Update 5 years ago
On This Page:
- Add a Moodle Folder and Upload Files
- Organize the Files within a Folder
- Create a Zip File
Moodle allows you to post multiple files at once in a Folder. Folders can contain files such as PDFs, Word documents, or image files, but cannot contain Moodle Activities (such as Quizzes, Assignments, and Forums) or Resources (such as URLs or Pages).
You can upload individual files or a .zip file containing several files on your computer to a Folder. You can update the folder to add additional files, rename files, or move them into sub-folders.
Note: You must first use the Activity Chooser to add a folder, as detailed below. You can then drag-and-drop files into the upload box on the Adding a new folder page. You cannot use drag-and-drop a "folder" from your computer onto your Moodle course page, but you can drag-and-drop a .zip file and opt to unzip and create a folder.
Step 1
On your course page, click Turn editing on (green pencil icon Turn editing on green pencil icon, top right).
Step 2
Locate the Section where you want the resource to appear, and click the grey arrow (Screenshot of arrow next to selection title.) on the left of the Section title to open the section if it is collapsed. Then click + Add an activity or resource (bottom right of the Section). The Activity chooser will open.
Step 3
In the Activity chooser, scroll down to the Resources heading and select the Folder radio button, then click Add. The Adding a new folder page will open.
Step 4
In the Name field, provide a title for your folder (required). The name you enter will display as the link to the folder on your course page.
Step 5
In the Description field, add a brief description of the folder contents (optional). To display the description on the course page, check Display description on course page (optional).
Step 6
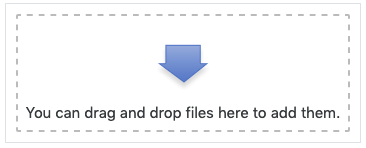
Add files under the Content heading. The easiest way to add files is using drag-and-drop:
- Arrange your computer's windows so that you can view both the Files area in Moodle and the files on your computer.
- Select and drag each file from your computer onto the large blue arrow in the Files area in Moodle.
Step 7
Alternatively, you can use the File picker to browse for files on your computer.
Note: The easiest way to upload multiple files with the File picker is to first make them into a .zip file, then unzip the file in Moodle. For directions on zipping files, see Create a Zip File (below).
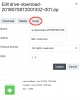
- Under the Content heading, click Add... (Screenshot of adding a file to the folder.) at top left of the Files area. The File picker pop-up window will open.
- Select Upload a file (left) and then select Choose file. The File picker window will open for you to search for and select the file on your computer. Select the file you would like to upload and click Open. The File picker window will close and the name of your file will appear next to the Choose file button.
- Select Upload this file. The File picker window will close and the file will be listed in the Files area
- If you have uploaded a .zip file to your folder, the next step is to unzip it. In the Files area, select the zip file icon. A pop-up window for the file will open. Click Unzip (at top). The pop-up window will close and the original files will appear along with the .zip file in the Files area.
Step 8
To select how folder contents should display from the Display folder contents drop-down menu, choose: On a separate page or Inline on a course page.
If you choose to display the folder contents on a course page, the description will be displayed only if "Display description on course page" is checked. Also note that when a folder is displayed on the course page, participants' view actions cannot be logged.
Step 9
To have subfolders expanded by default, select the check box for Show subfolders expanded.
Step 10
To allow students to download the entire contents of a folder as a .zip file, select the Show download folder button.
Step 11
Click Save and return to course (at-bottom) to complete the file upload process. The Folder will appear in the Section to which it was added with a folder icon (screenshot of folder icon.).
Organize the Files within a Folder
Files in folders are listed in alphanumeric order. To make the files appear in a particular order for your students, you will need to rename the files.
One option is to add numbers in front of the file names, for example:
01-handout.pdf
02-reading.pdf
03-spreadsheet.xlsx
04-instructions.docx
To rename files already in a Moodle Folder:
Step 1
On your course page, click Turn editing on (green pencil icon Turn editing on green pencil icon, top right).
Step 2
Locate the folder you want to configure and click Edit, and from the drop-down menu, click Edit settings. The Updating Folder page will open.
Step 3
Under Content, in the Files area, open any sub-folders as needed. To rename a file, click the File icon. A pop-up window will open.
Step 4
In the Name field, edit the name, then click Update. The pop-up will close and the Files area will show the new file name.
Note: DO NOT remove or change the file extension (e.g., .pdf, or .docx). A proper file extension is required for the file to download and open for your students.
Step 5
Rename any other files and click Save and return to course.
Create a ZIP File
To upload multiple files at once using the Moodle File picker, compress the files on your computer into a .zip file. A .zip file is a file type where multiple files or folders are compressed into a single, smaller file with a ".zip" file extension. Uploading multiple files to Moodle as a .zip file can save you time because it requires less clicking.
Windows Users
In your computer's file browser, hold down the Control key as you click to select the folders or files you wish to compress. Right-click any of the selected files. In the drop-down menu that opens, scroll to the Send To option, and select Compressed (zipped) folder. A new .zip file will appear in the same directory (folder) as the files you selected. You can rename the .zip file for easier identification before uploading it to Moodle.
Mac Users
In your computer's finder, right-click (control+click) on the folder or files and select Compress. A new .zip file will appear on your computer in the same directory (folder) as the files you selected. You can rename the .zip file for easier identification before uploading it to Moodle.