A Quick Tour of Moodle for Instructors

Emmanuel
Last Update hace 5 años
On This Page:
- The Navigation Tray and the Course Management Panel
- Moodle is Structured Around "Blocks" and "Sections or Weeks"
- Course Settings
- "Turn Editing On" to Add Content to your Course Page
- There are Different "Roles" in your Course
- Need help?
- A Few More Things to Consider...
The Navigation Tray and the Course Management Panel
The Navigation Tray
The Navigation tray is a collapsible menu that allows you to move about your course, access the course gradebook, move to other available courses, and access your dashboard.
To open and close the Navigation tray, select the Navigation tray toggle (hamburger menu (hamburger icon), top left). The Navigation tray will either open (at left) or collapse; allowing an expanded view of your page.
- Moodle Home is the entry page for all of Moodle.
- Dashboard lists the courses in which you are currently enrolled, links to future and past courses, and links to activities requiring attention such as ungraded assignment submissions. You can customize your Dashboard page by adding blocks such as Calendar or Upcoming Events to show deadlines and events for the classes you are teaching or taking.
- Calendar lists University events, course events, group events, and user events.
- Under My Courses your courses are listed. This is the most convenient way to move from one course to another. Courses that are not released to students are indicated by a crossed-out Eye icon
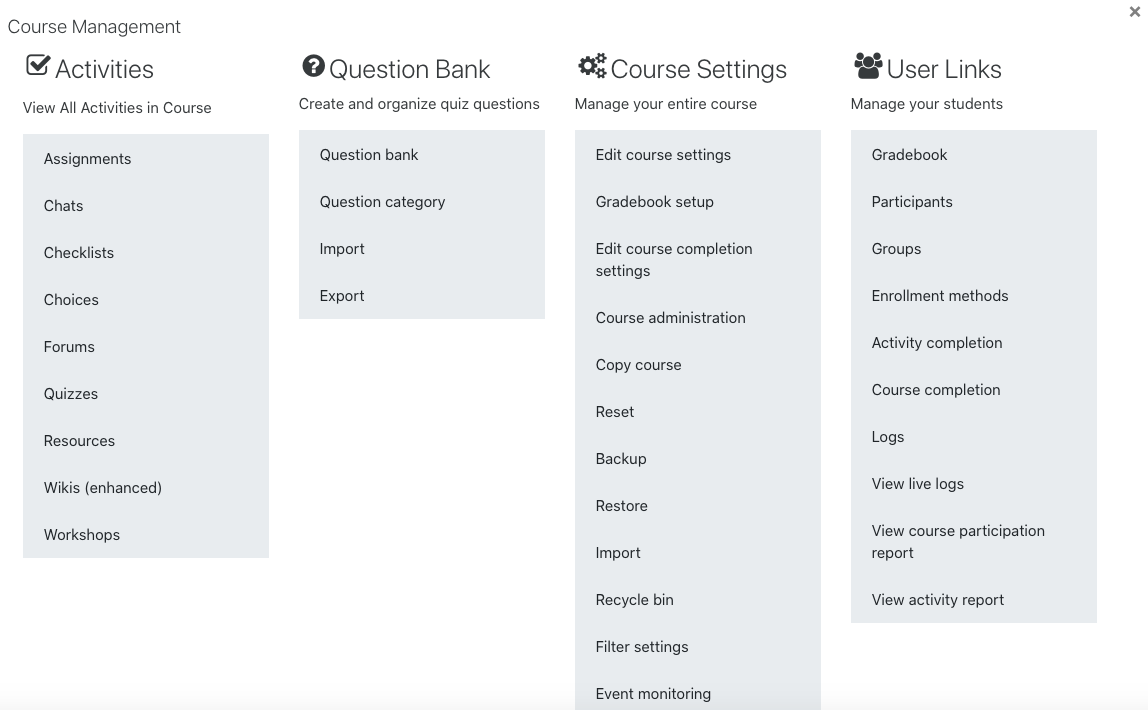
The Course Management Panel
The Course Management panel gives you quick access to all the important settings you need for your Moodle course.
At the top of your course page, select the Course Management button (gears icon) to open the Course Management panel. The panel contains easily identifiable links to Activities, the Question Bank, Course Settings, and User Links.
Moodle is Structured Around "Blocks" and "Sections or Weeks"
By default, a Moodle course page is divided into two colums. The right side contains blocks and the center contains sections.
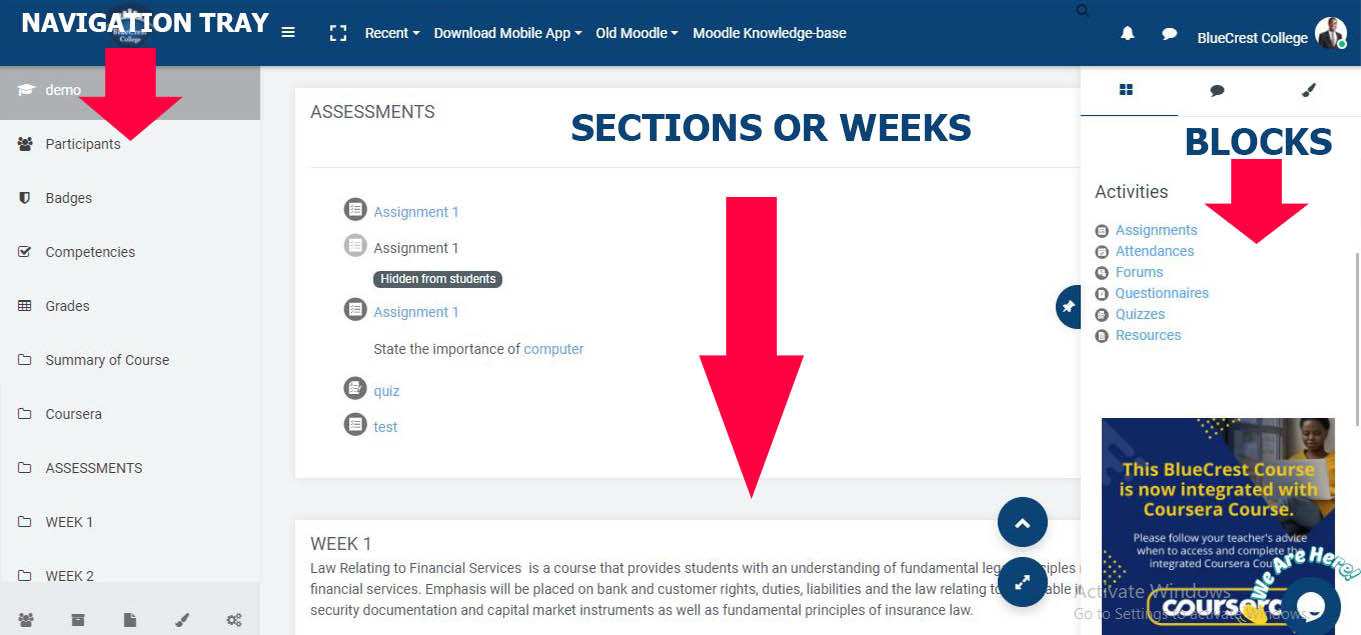
Blocks
The right side column of a Moodle page contains blocks. You can rearrange most of the blocks and set whether particular blocks show only on the Moodle course home page, or on all pages.
Most blocks update dynamically with information about the course. For example, blocks such as Calendar and Upcoming Events update when date-based activities are added to the course. In contrast, an HTML block can be added to post static text in a side column. This can be useful for posting contact information and office hours.
Which blocks show at any moment depends on where you are in Moodle. For example, the blocks displayed on your course home page are different from those displayed when viewing an assignment or forum. Which blocks are displayed can also depend on your role in the course. For example, teachers may see blocks that students do not.
Blocks can be hidden from students by selecting the gear icon (The update icon looks like a gear or wheel, top right of block) block and choosing Hide [Block Name] from the drop-down menu. For more about blocks, see Add and Remove Blocks in Moodle.
Sections (or Weeks)
The main column of the your course page is divided into Sections (also called Topics or Weeks) where course content and activities are shown. You can use the sections to organize your course by content type, or in chronological order. If you choose to order your course chronologically, you can have Moodle automatically provide a section per week. You can put links to Resources (files, weblinks, folders, etc.), and Activities (assignments, quizzes, discussion forums, etc.) inside of these sections.
To edit Section names, click Turn editing on (green pencil icon of Turn editing on (green pencil icon) at top), then click Edit at the top of a section and select Edit section or Edit topic or Edit week, depending on the Course format in use (see Course Settings, below). On the page of settings that opens, in addition to editing the Section name, you can add a Summary (a brief description that shows on the course page underneath the Section name), and you can restrict access to the Section by conditions such as group, date or grade.
Course Settings
The overall settings for your course are found in the Course Management panel which can opened by selecting the Course Management button (gears icon). Under Course Settings, click Edit course settings. The Edit course settings page will open.
Some settings are populated automatically with information from SPIRE when the course is created. Other settings are up to the instructor.
The Edit course settings page is where you select the course format. You can organize your course sections by Topics or Weeks. You can determine how many sections appear in the center column, and determine whether the course is visible to students. For more information, see Important Settings for your Moodle Course.
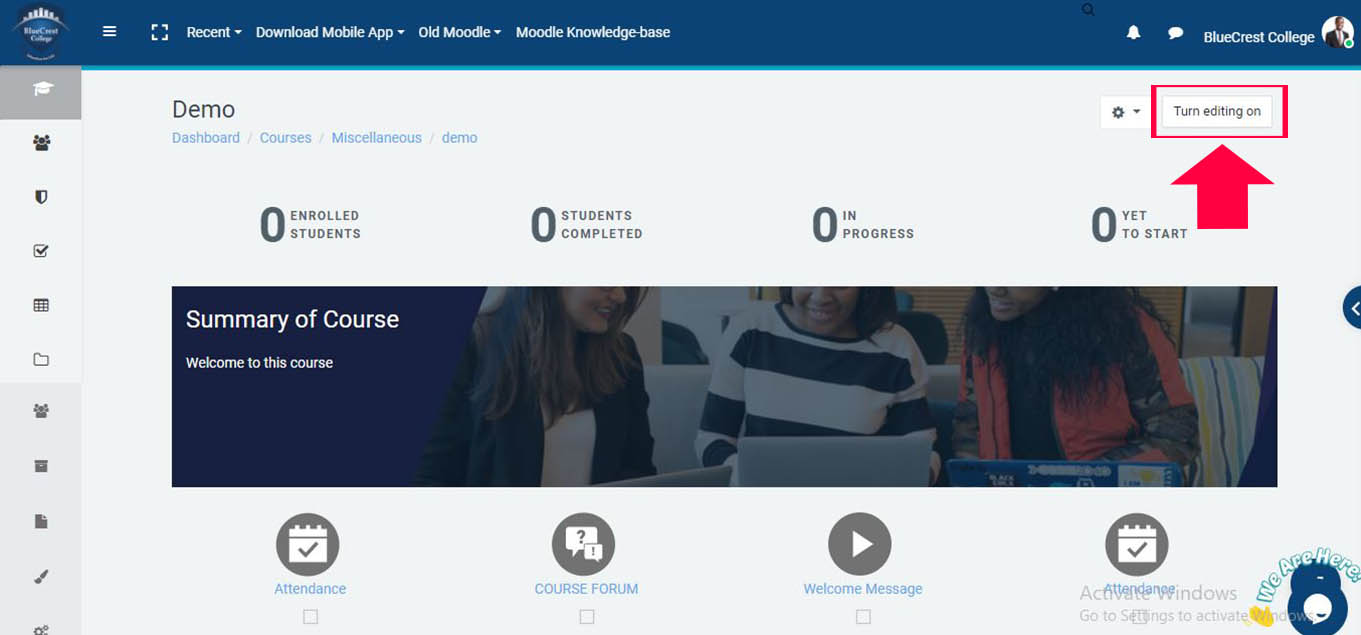
"Turn Editing On" to Add Content to Your Course Page
Turn Editing On
Select Turn editing on at the top right . Icons and menus will appear next to any editable elements already on the page.
Select the pencil icon to quickly change the name of an item. In the text box, type the new name (eg. Week 1)and hit Enter on your keyboard to save the changes.
To move an item, drag it with its Move tool
Click Edit (at right) for more options. A drop-down menu will appear with several actions, including Edit settings, Move right, Hide, Duplicate, Assign roles, and Delete.
Add Resources and Activities to Sections
With editing turned on, click + Add an Activity or Resource to open the Activity Chooser and add content to your course.
Resources include static content such as files, labels, and URLs. A quick way to add files to a course is to drag them from your computer desktop onto the specific section of your course page in the browser. For more about adding resources, see About Adding Resources to a Moodle Course.
Activities, such as forums, quizzes, assignments, and wikis, enable your students to interact with each other and submit work to instructors. For more about adding activities, see About Adding Activities to a Moodle Course.)
The Activities Block
Activities Block such as Assignments and Workshops.The Activities block is added to new courses by default and can be found on the right side of the Course page. When students select any of the various links in this block, which are determined by the types of Activities in your Moodle course, they can view all activities of that particular type on a summary page (for example, all quizzes or assignments).
The first time you create a new type of activity in a course, a link to the summary page for that kind of activity will automatically be added to the Activities block.
For more information, see The Activities Block in Moodle.
There are Different "Roles" in your Course
Within Moodle, each user has a default Role:
Teacher (default role for instructors)
Teachers can add resources and activities, change course settings, and grade student activity.
Non-editing teacher (default role for TAs)
Non-editing teachers can view content and grade student submissions.
Student (default role for students)
Students can view Resources, participate in Activities, and appear in the Gradebook.
Guest
Guests have access to the course page and can view materials but cannot participate in activities or view student-submitted content. Guest access is turned off by default but can be enabled by an instructor. For more, see Guest Access to Moodle Courses.
Depending on your role in Moodle, you may be able to switch to other roles. For instance, if you are a Teacher, you can switch to a Student role to view how the course looks to a student, or switch to a Non-editing Teacher to view the course as a teaching assistant. (For details, see Roles in Moodle.)
Need help?
The Get Help link is always available in Moodle's top menu bar. Click Get Help to open the help drop-down menu then select Help For Instructors or Help for Students to be directed to the IT website with links to helpful articles.
You can also find the IT help links, Moodle Help for Students and Moodle Help for Instructors at the bottom of most pages, as well as a link to Moodle Docs for this page which open help on Moddle.org.
Moodle support provides step-by-step help pages on most features available in Moodle at BlueCrest University College. Search the IT Support Center or browse the Moodle articles in the IT Support Center.
Instructors, TAs, and departmental support staff are welcome to contact the Moodle unit with questions about Moodle at [email protected].
Students looking for additional support should contact the IT Help Center at Emmanuel - 0558556434 or Ruben - 0556043349
A Few More Things to Consider ...
- Hide/Show items from students.
- URLs can link directly into your course site.
If you want to bookmark your course, or put a link to it in an email or on a Web page, share the address (URL) in your browser's address bar to link directly to your Moodle course. Users will be directed to a login page.
- When you delete files that you uploaded to your course pages, they remain temporarily available in the Recycling bin.
When you upload a file to a course page, it goes into the System Files for your course. If you delete the link to a file from your course home page, the recycling bin will contain the items deleted for seven days. You will be able to restore the items during this period, including activities that contain student data. Be sure you also have a backup on your own computer or stored online
- The Gradebook in Moodle has many built-in functions.
The Moodle Gradebook is a powerful tool that provides instructors with the ability to do complex calculations and organize student grades in a variety of ways. You can mark tasks as extra credit, drop the lowest score(s) from a category, ignore blank grades in a category if the work is optional, and aggregate the scores in a given category (e.g. all quizzes) and make it a percentage of a final grade. For more, see An Overview of the Moodle Gradebook.
Instructors who used Moodle in previous terms will notice that grading has improved in Moodle in the Cloud. For Quiz activities, the grading, statistics, and general quiz management are easier to navigate. A new grade item duplication feature reduces the setup time for the Moodle gradebook. Instructors also now have the option to make assignment graders anonymous, facilitating peer feedback and evaluation.
Use Announcements to notify students.
Only the instructor and TAs can post to Announcements for a course. When they do, an email copy of that post is automatically sent to everyone enrolled in the course. See Course Announcements in Moodle.
Moodle sends email notifications for some activities.
You can have Moodle send email notices to you or your students when posts are made to a Forum. We recommend setting forums for force subscription. Individuals can not control some aspects of subscription from forums in their Profile settings.
When students submit an Assignment, they are automatically sent a submission confirmation email. Instructors can opt to receive notification when students submit, but the setting is disabled by default.